www.moospeed.com
MooSpeed
1
MooSpeed 2
MooSpeed 3
MooSpeed 4
Events
+Formula 1
+BTTC
+Lotus Factory
+Mini Days
+The Italian Job
+Birkett 6hr
+RGB Racing
+Le Mans
+Stoneleigh
Mooscellaneous
Trackdays
+Castle Coombe
+Karting
+Brooklands
MooLinks
Moogle
MooSPEED IV - Build Diary
March 2004
Not that much car stuff to report as I've now started on a major new baby project.
|
|
This project, although demanding at least has a proper manual. |

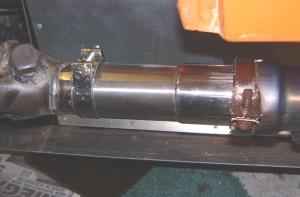
Here's another look at the exhaust fittings I've been making up. Pictured here is the Fisher manifold with the lamda hole plugged up, going into a reducer made by Powerspeed. On the back of this I've used the top end of the original R1 pipe to give it a slight bend. There are two reasons for this;
|
 |
Here are the relays mounted behind the dash on a sturdy bit of
ally U section. This is also serving as a clamp to hold the ECU
in place.
|
 |
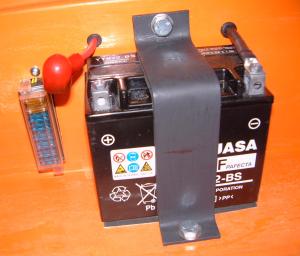
Something else I deliberated long and hard over was battery position. I had plans to mount it low down to reduce the centre of gravity but then it was a question of finding the right place. When I mentioned it to Mark Fisher he reminded me that a bike battery weighs very little compared to a car battery - any gains made by moving this 1 foot closer to the ground would be negligible. Luckily my hand was forced when I went to buy the battery terminals.
I arranged to borrow the shopkeeper's heavy duty crimping tool but
had to get it back by the end of lunchtime - about 2 hours. |
|
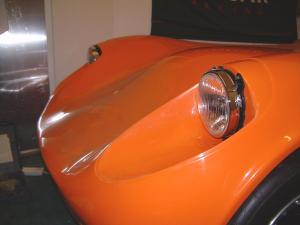
Here's a shot of the headlights, I've just trial-fitted them for now, they aren't wired up. You might be able to see that the mounting points for the lights sits just a bit too high. There are perspex covers which fit snuggly over the headlamp bowls so I'm going to have to do some marking up and filing down.
|
 |
![]() A few words on dependence - the kitcar jigsaw
A few words on dependence - the kitcar jigsaw
![]() This is something
you quickly have to deal with when building a car. It's like a big jigsaw,
you often can't fit a part you want as it's dependent on something else
being done. For instance, I can't drive it yet as the bonnet doesn't clamp
down. The bonnet doesn't clamp down because the clamp will be on the sidepod.
I can't fit the sidepod until I've completed the exhaust, etc.
This is something
you quickly have to deal with when building a car. It's like a big jigsaw,
you often can't fit a part you want as it's dependent on something else
being done. For instance, I can't drive it yet as the bonnet doesn't clamp
down. The bonnet doesn't clamp down because the clamp will be on the sidepod.
I can't fit the sidepod until I've completed the exhaust, etc.
Here's another one, I'm doing
the dashboard wiring but I can't fix the cables in place as I haven't
got the finalised switch positions. I can't do the finalised switch positions
until I've made a dashboard blank and fitted the drivers seat. Huh ? Well,
the reason is that I'll be placing the switches by ergonomics alone, aesthetically
they may be less than perfect. I'll do this by sitting in the drivers
seat (when I've decided on the position of that and fitted it) and then
going through the list of functions, horn, lights, indicator, etc. and
placing stickers on the dashboard where my hand naturally heads for -
I may even do it blindfolded ![]()
This is the beauty of building
your own car - you decide where things are and how they work as opposed
to a design "board" who have to fit Mr & Mrs Average. The
switches I've gone for are following with the modern-retro theme, they
are 1950's style switches mounted in carbon fibre and sited alongside
a digital dashboard. Kinda goes with the 60's look of the car and the
ultra-modern powerunit ![]()