www.moospeed.com
MooSpeed
1
MooSpeed 2
MooSpeed 3
MooSpeed 4
Events
+Formula 1
+BTTC
+Lotus Factory
+Mini Days
+The Italian Job
+Birkett 6hr
+RGB Racing
+Le Mans
+Stoneleigh
Mooscellaneous
Trackdays
+Castle Coombe
+Karting
+Brooklands
MooLinks
Moogle
MooSPEED IV - Build Diary
June 2004
This months update includes;
- Indicators
- Under-bonnet painting
- Suspension upgrade
- Bonnet-support.
Indicators
Indicators have been a bit of an ongoing saga
for the past couple of months. One reason is because I'm a fussy whatname
![]() and secondly because I'm being a bit dim
with regards to the wiring.
and secondly because I'm being a bit dim
with regards to the wiring.
I haven't been able to find a set of indicators for
either the front or the sides that I particularly like. ![]()
I'm not overly keen on the motorbike fairing type that
are commonly used in the headlamp bowls. Someone suggested fitting an
amber bulb in the headlamp unit itself, after having bought 5 different
types of indicator off ebay and subsequently re-selling them this could
be something well worth looking into. For the time-being I've decided
to temporarily fit a pair of the bike-fairing versions which were bought
from M&P for the bargain price of 10p a pair ![]()
Wish I'd bought loads of sets for that - I'm sure I could've re-sold them
on ebay for a quid at least...
The side repeaters have also been a pain to find exactly
what I'm after. Part of the problem being that everyone wants smoked,
coloured or generally fancy side repeaters - finding bog-standard plain
orange ones to match the orange bodywork is more of a challenge.
I can see that I'm going to end up with the standard oval shaped versions.
The simplest choice is often the best. I actually already have some simple
oval ones in my vast stockpile of indicators but they aren't 'e' marked
and hence won't pass the stringent government test. I've also got some
Skyline ones which I may fit for the test as they do comply and then retro-fit
the dangerous ones.
|
Nissan Skyline side repeaters 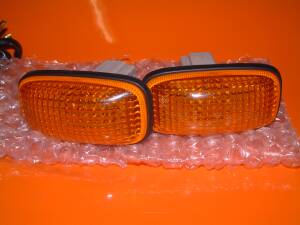 |
Oval side repeaters but not E-Marked 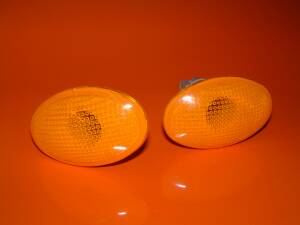 |
|
Iridium indicators 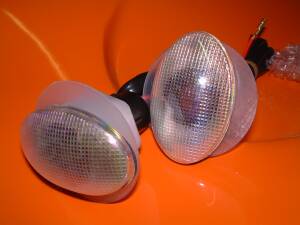 |
My 10 specials !! 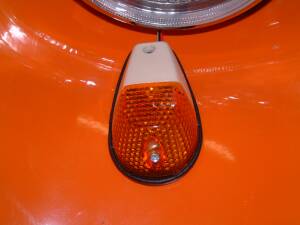 |
The next problemette is due to the wiring, for some
reason I just can't seem to fathom out how the flasher unit and everything
else is supposed to go together ![]()
I bought a couple of simple flasher relays off ebay
but they are 3 pin jobbies. Couldn't suss out the 3rd pin. ![]()
I've had some ideas from Brian Beavis from the Sylva register and from
speaking to a few others but it all seems to be overly complex involving
the need for a specific hazard switch and suchlike. I wish I could remember
how I done it on the Westfield, I had two simple chrome lever switches,
one was a double pole switch which was used for the hazards.
At Stoneleigh I bought another cheap flasher relay
and a cheapo hazard switch - these were so I could meter out the switch
and re-wire with my own chrome toggle switches, I'll sell the hazard switch
on afterwards. I've now got this sussed but it's a bit awkward to sort
it with the switched ignition for indicators and non-switched for indicators.
For the time-being I'll leave it in place and just use the hazard switch
as-is. I'll come back to this once I've got more time on my hands and
start on the car improvements. ![]()
Under-bonnet painting
OK - this may be a bit boring ![]() for an update but thought it might be worth
mentioning what I've used. I initially painted on some protective sealant
stuff called Wunderseal. This is supposed to prevent stone-chipping on
the underside of the wheel arches. These would show through as a star-pattern
on the external gelcoat.
for an update but thought it might be worth
mentioning what I've used. I initially painted on some protective sealant
stuff called Wunderseal. This is supposed to prevent stone-chipping on
the underside of the wheel arches. These would show through as a star-pattern
on the external gelcoat.
This is very weird stuff, so thick that if you held the pot upside down it wouldn't flow out immediately. A bit awkward to paint on as it's quite sticky. Unfortunately, although I've laid it on as thick as I can it dries and shrinks back a bit - the final finish not being as thick as I hoped. However, it does feel a bit "rubbery" so hopefully it'll work.
I then overpainted this and the whole underside of
the bonnet in black. ![]() Word of warning
Word of warning![]() - I painted this without leaving adequate
ventilation. I didn't realise at the time as you sort of breath in the
fumes and get used to it but I did suffer - along with the rest of the
house when the fumes filtered out of the garage.
- I painted this without leaving adequate
ventilation. I didn't realise at the time as you sort of breath in the
fumes and get used to it but I did suffer - along with the rest of the
house when the fumes filtered out of the garage.![]()
![]()
![]()
![]()
 |
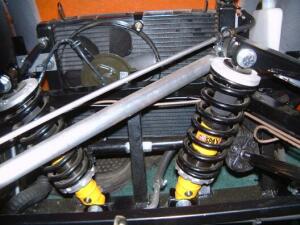
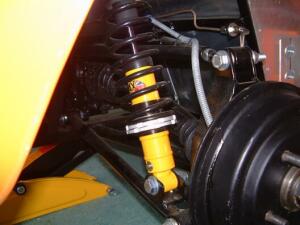
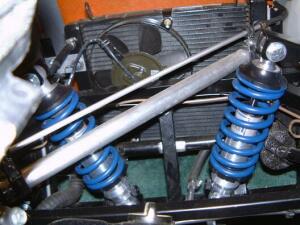
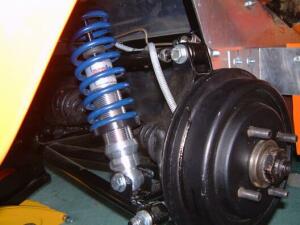
Suspension upgrade
I'm already upgrading stuff even though it's not
been on the road !! ![]()
The reason I'm doing it now is that Mark Fisher kindly allowed me to upgrade the existing suspension at a reasonable cost to Protech shocks and harder and lower springs. The original spax units haven't seen any road use anyway - just been supporting the stationary car for the past couple of months.
I hadn't actually intended getting lower springs but like an idiot I re-assured Mark that I already had 7" springs fitted as standard. I say like an idiot as I measured them with the weight of the car on them - DOH !!
Still, I would've wanted to lower it at some point
anyway - I think they ride too high as standard. I'll no doubt change
my viewpoint the first time the sump gets smacked and dumps the oil out.
![]()
| Before |
After |
|
|
|
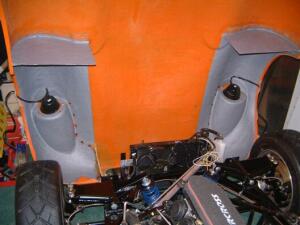
Bonnet support
With the whole of the front end on the Fury flipping forwards there is
a need to fit some means of stopping the bonnet hinging all the way forward
and smacking the nosecone on the tarmac.
I initially fitted a 6mm threaded rod bent to shape
between the radiator support and the left hand bonnet webbing support.
This was OK until I simulated a gust of wind against the inside of the
bonnet by giving it a bit of a gentle shove. The bar just bent along with
the radiator support - it then proceeded to strip the thread straight
off the rod ![]()
![]()
![]()
The second attempt was made with a piece of cable and
supporting from the bonnet webbing to the front suspension mount - if
this bent then I wouldn't want to drive the car ![]() This does seem OK but is on the limit in
terms of tension I'd say.
This does seem OK but is on the limit in
terms of tension I'd say.
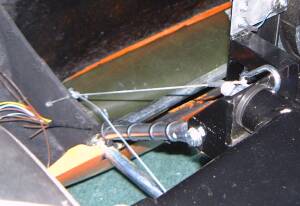
I might try and find some way of fitting it to run to a point higher up as this would take the strain off completely in terms of the lever-effect. I don't know how much the bonnet weighs but I wouldn't like trying to throw it - it moves 6 foot or so at the back edge, imagine this movement to be down to a few inches at the fulcrum (where it hinges from) and you've got some idea of the force it's trying to support.