www.moospeed.com
MooSpeed
1
MooSpeed 2
MooSpeed 3
MooSpeed 4
Events
+Formula 1
+BTTC
+Lotus Factory
+Mini Days
+The Italian Job
+Birkett 6hr
+RGB Racing
+Le Mans
+Stoneleigh
Mooscellaneous
Trackdays
+Castle Coombe
+Karting
+Brooklands
MooLinks
Moogle
MooSPEED IV - Build Diary
July 2004
Jobs done since last update;
- Dashboard & switches template
- Gearchange reversal
- Fuel pump guard
- Fisher factory open day
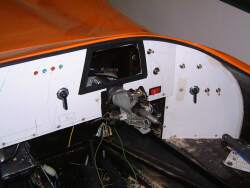
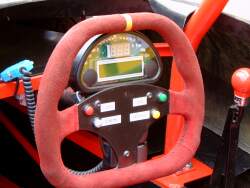
Dashboard & switches template
I've bolted on my rough template and started drilling
the holes to position the switches. I want to wire these up and have them
as close as I can to the finished article - in essence I should be able
to get this dashboard blank to be a fully working version with all the
wires neatly tied in the back. This was I'll hopefully avoid any cock-ups
with cutting out the expensive carbon-fibre version. ![]()
As mentioned a couple of months back I positioned the switches by sitting in the seat (see below for seat mounting notes), bolting the wheel on and then marking out where my hands naturally "fell" to operate each function on the list, i.e. indicators, lights, horn, etc. I still think this will be the best way to suit me, it won't suit others but I'm building it for lil' ol' me and no-one else.
I can see I'm going to have problems mounting the indicator and headlamp switches as they have large holes to cut out. It won't be so much of a problem cutting the holes but more of a problem stopping the switch from spinning in the hole as there isn't a "key" to stop it twisting. When it's mounted in the carbon fibre I might just add a dab of sikaflex to help stop them twisting.
The thing to remember here is to not have any switches outside of the "zone" for SVA - this is 127mm from the outside edge of the steering wheel, in this case it's the large Sierra wheel. So far however they've been pretty much within the zone for my smaller Momo wheel as well.
The only one that might be a problem is the ECU switch on the angled section in front of the handbrake. If this will be a problem then I'll just unbolt it - switch it on and leave it taped up behind the dash until after SVA. It's on a switched circuit from the key anyway so it doesn’t matter that much. I've also got the fuel pump switched - I don't particularly need these two switched but I'm a control freak.
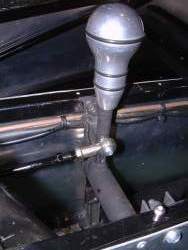
Gearchange reversal
As mentioned previously the bellcrank gearchange
ended up working the other way to how I'd planned. I would've been pulling
back to change down and pressing forward to change up. In common with
racecars and I think a more natural way is to have the upchanges on the
pull-back and vice-versa.
Although I'd already worked out the right measurements
and fulcrum points I found that in practice I just ended up guessing the
best place for the gearlever to pivot from. This didn’t work out
right on the first guess as I figured the gearlever was moving too far
back and forth. This was totally down to lack of concentration caused
by the fact I was working on it at 3AM. ![]()
The next day I woke up and realised what a dummy I'd
been. Re-drilling further from the pivot point and re-fixing and I soon
had a good action on the gearlever. ![]()
The mounts aren't the best-looking bit of engineering on the car but are
sturdy enough and they're hidden from the public eye ![]()
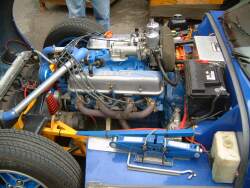
Fuel pump guard
I wanted to make up something to protect the fuel
pump as it looked to me like it was in a bit of a prone position. It probably
would have been OK but I've made up a guard from sturdy aluminium anyway.
This will also help to direct some of the airflow from the underside the
car.
The rear valence of the car will act as
a bit of an airscoop so I'll probably panel off the rest of it at a later
stage as well. The alternative I've seen is to have holes in the underside
of the valence. I'd like a nice carbon fibre venturi here but I think
I'm getting ideas above my station, I'm certainly getting ideas above
my budget ![]()
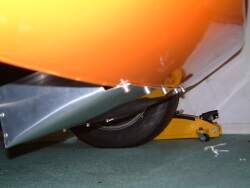
It actually looks pretty pants in the photo which means that it probably will do so when I get the car out the garage again, in which case it's been another waste of time making it as it won't be staying.
Fisher factory open day
On July 3rd I visited the Fisher factory as it was open day. Main items of interest to me were the mid-engined versions and a V8 one - not that I'm getting any ideas mind you…I'll finish this one first.
Although I'd planned on getting some answers to a few questions and seeing how people had done things I totally forgot and ended up kicking tyres rather than taking in the details. I bought some heat-resistant tape and confirmed that some of the things I've done others had also done so it was a useful visit anyway.
 |
 |
 |
 |
 |
 |