www.moospeed.com
MooSpeed
1
MooSpeed 2
MooSpeed 3
MooSpeed 4
Events
+Formula 1
+BTTC
+Lotus Factory
+Mini Days
+The Italian Job
+Birkett 6hr
+RGB Racing
+Le Mans
+Stoneleigh
Mooscellaneous
Trackdays
+Castle Coombe
+Karting
+Brooklands
MooLinks
Moogle
MooSPEED IV - Build Diary
September 2004
Jobs done since last update;
- Seat mounting
- Seat re-trimming
- Accelerator pedal
- Ignition coil mounting bracket
The more observant readers may have noticed that I've skipped a month and gone straight from July to September. In fact, it's more like half-way through July until the start of September. Nothing at all happened with the build during August, what with holidays and generally being too busy no progress was made. No matter, I've just resigned myself that yet another Summer rolls by without the car on the road. When I think of those that knock up their cars in just a few short months it does make me wonder what it would be like to have "spare" time...
As you can see from above list- I'm back in the garage and plugging away, well, as much as my limited time will allow...
Seat mounting
I've fitted the drivers seat using an original
Caterham sliding mount. Although these are Caterham R500 seats the mounts
have different holes lined up which necessitated fitting them upside-down.
This actually worked out pretty nicely as when it's in the position I'm
using the handle is hidden under the seat out the way.
I tilted the seat backwards to (a) allow me to reach
the pedals easier without being closer to the steering wheel, (b) to stop
me "submarining" under the harness in the event of a front impact
(impossible anyway if I fit the crotch straps I've got) and (c) it feels
and looks so much "cooler" ![]()
The seats are tilted by using some aluminium pipe at the front cut to
the right angle and height, these are mounted on top of thick steel washers.
Rich Miles' s Striker was fitted using a similar method but with thinner
ally tube so I can't see this being a problem at SVA time.
 |
 |
 |
The seats are carbon-kevlar so they'll flex by design unlike carbon-fibre ones. This will mean that on the fully retracted position the seat will rub against the rollbar - it also "creaks" so I've fitted another support from the rollbar to push against the back of the seat.
Drilling the holes for the seats was a real pain in
the backside - although I marked up where the holes should've gone I found
that due to the tilt the bolts didn't line up at all. Spent ages and I've
got two more holes than I wanted - never mind, it's race-lightened ![]()
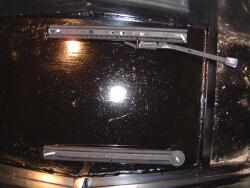
The passenger seat has been fitted by the use of some U-shaped lengths of steel. These were excess to requirements on a computer server rack, the racks are designed to support 180 kilos so should be sturdy enough for the most lardy passenger. I've bolted these through the front chassis bar and reinforced them at the back as close to the rear chassis bar as possible.
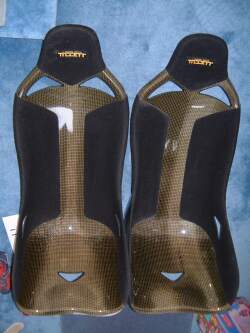
Seat re-trimming
I've sent the seats back to Tillets to be re-trimmed. If you've read earlier
pages you'll know that I got these seats cheap as they were seconds. Steve
Tillet also kindly gave me some of the resin so I could attempt to fill
in the holes. Although I've spent hours doing this and the result is not
too bad it's not perfect. Although I've exchanged perfection for saving
money it's going to be one of those things that really bugs me.
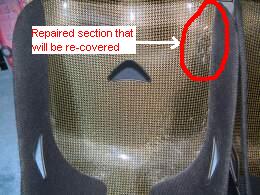
Here is a picture of the seats trimmed as they are now, as you can see - the carpet runs down the sides, i.e. along the outside of your thigh. I've asked that they be re-trimmed underneath a bit more as this will cover up the pitting and my imperfect repair. There will still be some pitting showing on the seat back but overall it should look much better. Check back next month to see the difference.
 |
 |
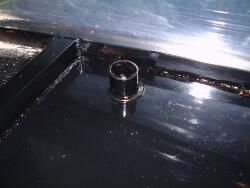
Accelerator Pedal
Although I had loads of great plans for the accelerator cable and pedal
I've ended up going with the simplest design. I did spend a long while
chopping the pedal and trying different pivot points to get it just right.
It's still going to be a hair-trigger response due to teh bike engine
revving so willingly - not much I can do about that apart from get used
to it.
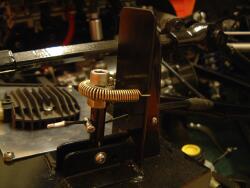
Although in the picture it looks like the cable is held in place by the clamp just behind the pedal it is actually pressed down by the large bolt threaded into the top of the pedal. The small clamp is in case the cable slips.
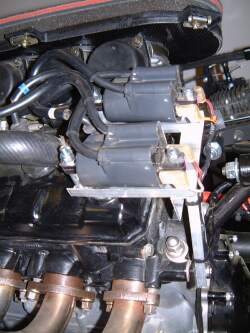
Ignition coil mounting bracket
Not a great deal to say about this, I've made
the bracket from sections of extruded aluminium and it bolts through the
engine mounts. Sturdy as a rock. I don't know if I need to worry about
the vibration affecting the coils. As standard they are mounted on the
engine, or more specifically the airbox, so I'm hoping they'll be OK.